Saturday, September 7, 2013

This is Halloween

It's coming, it's coming, it's coming!! Halloween is almost upon us once again! There is not one thing I dislike about this time of year. I don't mourn the end of summer one bit. I look forward to the cooler temps, the crisp humidity free air, the smell of leaves turning glorious red, orange and yellow. Halloween kicks off the holiday season, which I love. My birthday is a week before Halloween, which means PRESENTS. Who doesn't like those? Oh, and pumpkins. Carving, all those big orange pumpkins! So much to look forward to! Yes, I am a big KID still, and I hope I NEVER grow up!

Which brings me to the point of this blog. I still go Trick-or-Treating. I still dress up in costume. This year I was almost in a panic because I just couldn't figure out what I wanted to be. I had a few things in mind, but no real direction on what to do or where to start. All of a sudden I got creative and now I can't pick just what I'm going to do. So I'm going to post what I have come up with and what I have done in years past. These are in no particular order.

Everything is done with regular eyeshadow/eyeliner/makeup. Only a few I used a little bit of liquid latex, some crafting rhinestones and black string in one.

This paired with some cute fairy wings for a simple Dark Fairy look.
We never know what lies beneath. 

 Masquerade Mask made with white and black eyeliner and eyeshadows. 

Batgirl
2 different Bollywood inspired looks. 


Dia De Los Muertos (Day of the Dead)

2 different Fairy Princess looks. 

Milky Way
Goth Girl

Medusa

Pin Up Girl

Pop Art

Mardi Gras
Ice Queen

2 different Spider Queen looks


Broken Doll

Rocker Chick
Gothic Witch

Punk Rocker

Summer Storm


Cruella De Vil 
Tim Burton's Corpse Bride

Egyptian Queen

ZOMBIE!! 
Vampire
Voodoo Queen (black hair)
 Stitched lips using eyelash glue and black string. 
Voodoo Queen (white hair)

New for 2014 Halloween season! 

A mask is a perfect easy and quick way if you are short on time or need something last minute.


The old "lady" from the movie Insidious. 

And this is..umm.. a demon? What I look like when I cry with eyeliner on? 


The Bride of Frankenstein. 


Saturday, June 29, 2013

Strawberries on tacos?

I hate cooking, so when I do make something special and it turns out good I get all excited and sometimes end up posting a picture of the creation on Facebook. Such was the case last night. After I posted I had a few "WTF?" type responses, a few positive ones and a couple of messages asking for the recipe. So, without further ado, here is is.


Grilled Chicken Tacos with Strawberry Salsa. (NOT an original creation).

1 1/4 skinless, boneless chicken breasts. (I used 3, but that almost wasn't enough, so maybe go with 4)
1 tsp. Chili powder
1 tsp. Canola oil
12 fajita-size flour tortillas and Olive oil cooking spray. (I used regular bottled olive oil)
8 oz. Strawberries, hulled and chopped up/about 1 1/2 c. (I threw in more till it looked good to me)
2 med. tomatoes, chopped
1 med. avocado, chopped (I would use 2)
1 sm. shallot, finely chopped
1 lime (more if you want to garnish with lime wedges)
1/2 c. crumbled feta cheese (I used Gorgonzola and it was SO good!)
2c. cilantro leaves (I didn't actually use any, but they are pretty in it)

Rub down the chicken with oil and chili powder. Grill chicken, covered, 12 to 15 minutes or until cooked through. (165°F ), turning over once halfway through. When done let stand at least 5 minutes. If you don't have a grill or can't grill them cook the chicken in a pan on the stove with a bit of olive oil.

Spray tortillas with cooking spray and grill 1 to 2 minutes on each side or fry in a pan like I did.

In a bowl stir together strawberries, tomatoes, avocado, shallot and 1/8 tsp. salt. Squeeze juice of half a lime into mixture and stir everything together. (Here's where I deviated and skipped the salt, instead adding a few pieces of crumbled bacon. It was awesome!)

Thinly slice chicken into strips and serve in tortillas. Top with the strawberry salsa and sprinkle cheese and cilantro on top.

My husband ate his with some sour cream as well and said it was really good. I was surprised at how much we both enjoyed this. I was a bit leary of strawberries and tomatoes together, but it was outstanding!


Wednesday, May 29, 2013

In a carpeted sea of blue/green polish

I feel compelled to blog my latest disaster and how I fixed it. Or, in my case, cleaned it up.

I'm going to start at the beginning making this a longer story than it really needs to be, but I feel as though I need to draw you into my story, make you care more about all of this than you actually should. I want you to experience my pain and live the tragedy with me. I need you to understand the miracle that has happened.

It all started with an idea to paint my toenails. Its not officially summer yet, but with temps in the high 80's it might as well be. I love my sandals and flip flops, but even the cutest sandal doesn't shine if you have nasty toenails. I like the french manicure look on toenails so that is what I set out to do, and succeeded nicely. I should have stopped there, but no, I decided little blue petal flowers would look awesome on both my big toes (and they do). Really though, I should have just kept my freshly painted piggies as they were.

I painted some cute flowers on and went to clean up my hoard of polish when the unthinkable happened. I dropped my pretty blue/green polish on the floor....while it was open! Did I mention the floor was carpeted? A light color of carpeting? Yeah, well it is. And not just the floor, but I also coated my Kindle which was laying there where I had placed it the night before after being too tired to properly put it away. Of course, the case was open in order to let the polish freely flow over the screen.


At this point most people would launch themselves out of the chair and pick up the polish as quickly as possible. My only problem was the polish was covering one of my feet as well. I didn't really want to make matters worse by making blue/green footprints all over my carpet. Of course, I didn't have a tissue near me so ended up trying to clean off my foot with little cotton cosmetic squares. Once I was able to step down on the floor it was too late to quickly grab the bottle to try and minimize the spill, so I went and got my camera instead. 

My Kindle was my first concern, and really the polish wiped right off the Kindle and case with no problems. The home screen button is a little sticky, but still functional. Once that was cleaned my next step was the carpet. My first thought was to just leave it alone. There is already a small stain of purple cough syrup and the colors went well together. It didn't happen in a high traffic area (its beside my bed) and really no one was going to notice anyway unless they were in my bedroom, on the far side of the bed. But hey, maybe I will be bedridden soon and will have company. While they will show their concern for me they wouldn't be able to stop staring at the floor, wondering what the heck I spilled on it, and why it was still there. I'd know they were thinking about it and they would know I knew even though both parties would be too polite to mention anything out loud. So my second thought was to pour nail polish remover on the stain and started blotting feverishly with a rag. All this did was start to spread the stain. O.K., time to look online. I can't be the only person out there who has done this, after all, this wasn't my first time either, although the other incident was in my childhood in my moms house with a bottle of red polish (sorry mom), and didn't really involve much carpet, only a few flung polish strings when I shook the bottle without making sure the lid was on tightly. So what did I find online? HAIRSPRAY and RUBBING ALCOHOL. What the heck? Really? Seriously? Yep, I looked several places. Regular hairspray and rubbing alcohol. And it worked.

So here is what you came for. How to do it. By now your feeling my pain, and if you are reading this because you just spilled your bottle, its ok. I found it works better when the polish is dry. You can kinda scrape off the excess polish with a dull table knife. Not too hard, you don't want a bald spot in your carpet. Then just liberally spray the spot with hairspray, dump on some rubbing alcohol and start to blot the stain. I added a little warm water in the mix. Keep blotting, try not to scrub back and forth because you might spread the stain at first. Once most of it was gone I did some back and forth scrubbing, but not much. Seriously, the stain just lifted right before my eyes! A MIRACLE has occurred! Now, Acetone or polish remover may have done the trick eventually, but I also read it could eat the backing of your carpet away, or melt it. So yeah, lets keep the disasters to a minimum. You can still see a little bit of the stain, but I gave up pretty quickly on it. I really didn't spend much time scrubbing, and I really don't care that I can still see a spot when I look very closely. I won't have to worry when I am bedridden that someone might see it unless they are studying the carpet closely, probably wondering what the purple cough syrup stain is. 

Before

After


Thursday, May 2, 2013

Shabby Sheik on a Dime

I posted this on Facebook and was rather surprised at the amount of likes and comments I got, so I figured I would blog. I haven't blogged about anything in a long time now. I didn't forget about this blog, and I've had plenty I could be blogging about. I'm not sure what the deal is, but I will try to do better, but I digress.

I don't own the house I am currently living in and we have always known we would not be living here forever. We also know that this house will be torn down eventually and the owner really isn't into fixing things up or updating anything. We did a lot of work when we first moved in to make it livable while trying not to really work too hard on something we won't enjoy for years to come. Most things are done as cheaply as possible and as easy as possible. Enter my kitchen counters. O.K., not counterS, just one counter. I could really go into a huge diatribe about the kitchen here, but I would lose a lot of people along the way. After all, why should you really care about my kitchen. What you may care about is your kitchen, and your counter, or if you are lucky, counterS.

My counter did match the rest of the colors in the kitchen when we moved in, and if this was the 70's I probably would have loved it. However, the mustard color is just not for me. Now, you can paint formica counters, but that was more time consuming than I was willing to do. Enter my bright idea, contact paper or shelf paper. I didn't take any step by step pictures, because I didn't plan on blogging about this, and I didn't think there would be so many questions about it. It's pretty self explanatory anyway. Clean your counters to remove any grease and dirt, stick contact paper on, smooth out any bubbles with your hand and you're done. I lay a full sheet across the sink and after sticking it down I cut around the edge with a box knife. Easy. Peasy.

I did do this before on this counter and it's held up for at least 5 years of regular kitchen counter stuff. Don't put anything hot on it and don't use it as a cutting board and you shouldn't have any problems. I've cleaned mine with all types of cleaning solution, had the sink flood all over them and had several kool-aid related spills without staining. Even if you mess up a space simply peel it up and stick a new piece down.

Before.

And after. 

Pitcher added for design appeal. 

Next I must do something about that wall.... :)

Saturday, December 1, 2012

Ornament greeting

I actually made this last year, but ended up breaking a few of the ornaments this year when it fell shortly after hanging it up. Thankfully it's easy to fix and while doing so I took a few pictures and decided to show everyone how I made it.

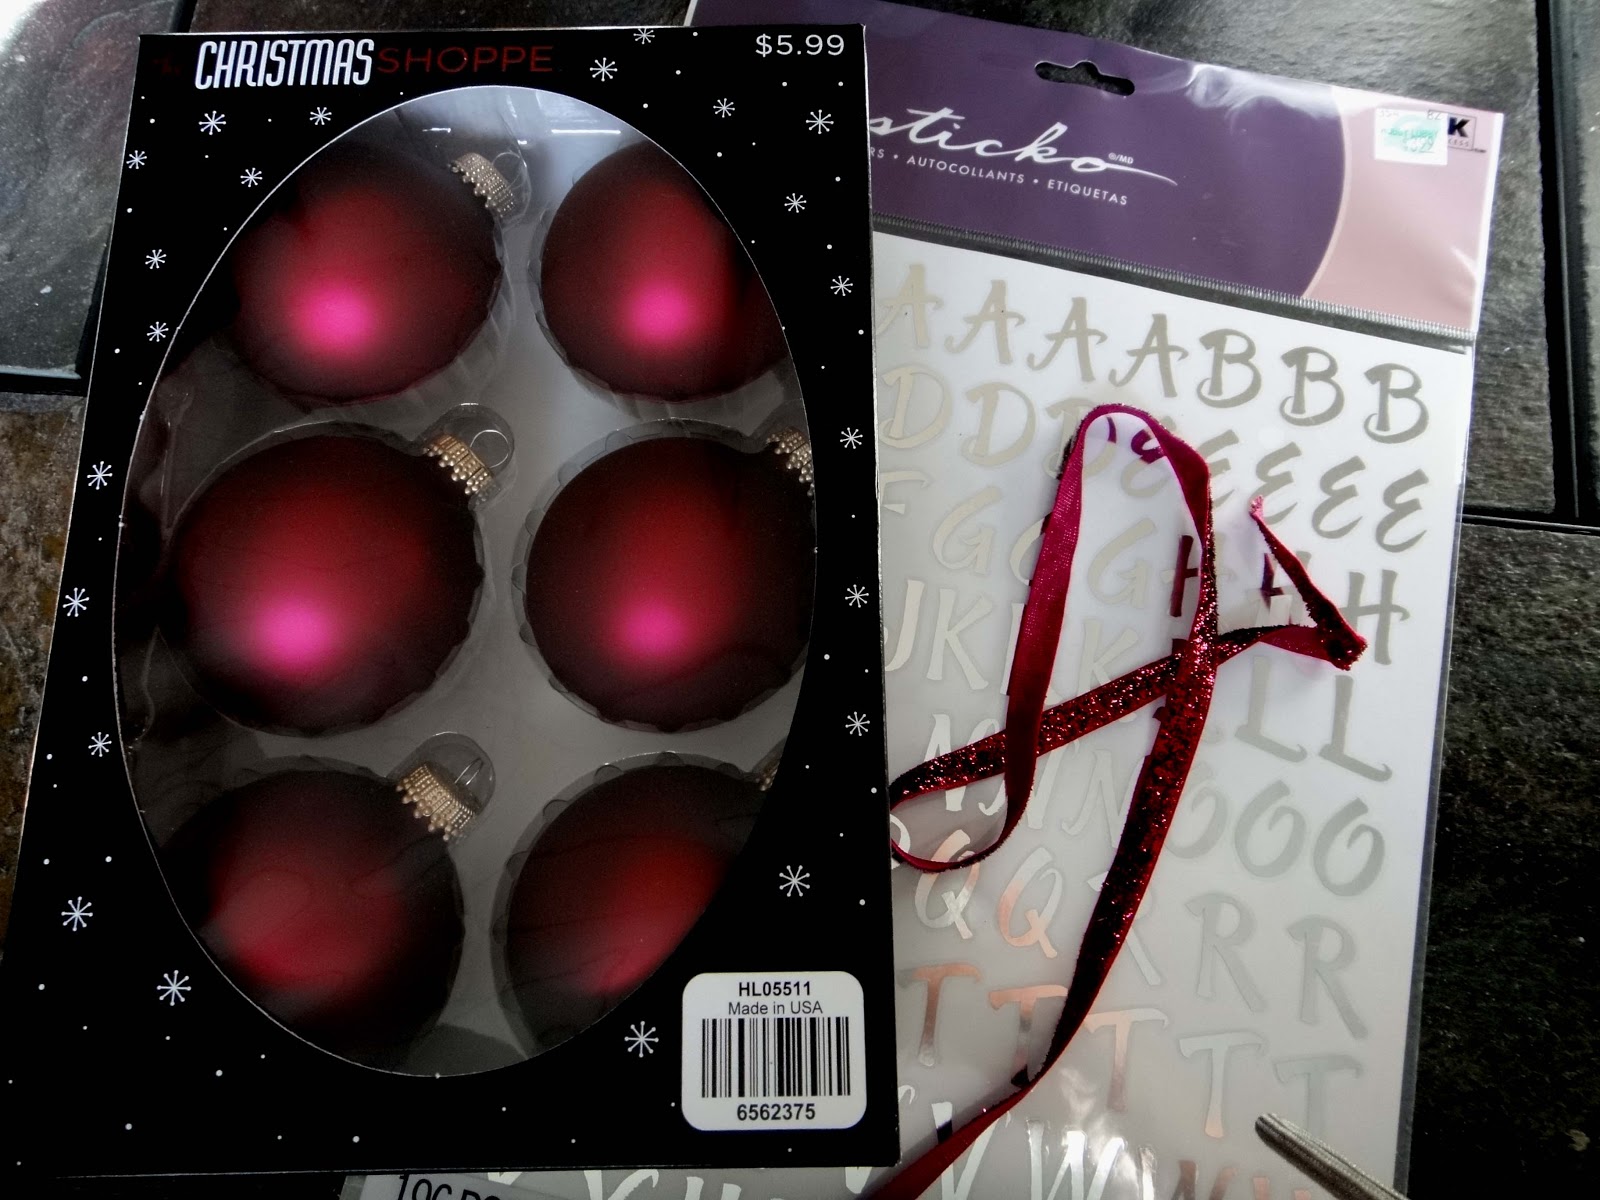
Supplies you will need are:


  • Christmas ball ornaments in the color of your choice. Most of my tree is red and silver so I went with red satin finished ornaments. Choose your favorite color or mix and match. You will need 14 balls. 
  • Alphabet stickers. I went with silver for the red and silver theme. Just pick a color that will stand out on your ornaments. 
  • Ribbon. Again, choose a coordinating color. I didn't measure the length of the ribbon I used. You will need enough for all 14 ornaments to fit on and more to hang with. 
  • Scissors


The rest is very easy. Take your stickers and place one letter on each ornament, trying to center it as well as possible. You can spell out whatever you want, just make sure you have enough of each letter sticker before starting. I used all the capitol letters on mine. 


Once all your letters are on you're going to thread your ribbon through the hook on the top of the ornament. I left the ribbon on the spool while doing this to make sure I used enough ribbon. Once all the ornaments are on, spread them out across the table and space them out down the length of the ribbon. When you are satisfied cut the end of the ribbon from the spool and tie each end in a knot to keep the ornaments from sliding off. 


I kept mine loose on the ribbon but you could tie a knot in each one at the hook to keep them in place. I know I may use mine in other places and wanted to be able to make it longer if needed or not as spaced out, depending on where I hang it. 

This would look fabulous hanging from a mantle, however my fireplace does not have one, so I hang it from my bookshelves. A mantle is on the list of must haves in the next house we buy. 


Professional pictures look SO much better! 


Tree update!

I just have to say, if you are looking for ornaments for your Christmas Tree, check out Hobby Lobby. They have a HUGE selection of the unique ornaments I love so much and also the traditional ball ornaments in all colors.

I happen to stop by the other day looking for some chalk markers and noticed the 50% off Christmas signs. Now, how can I resist that! I wanted to get some black ornaments for the tree. Yes, black. I also picked up some cool black and red ribbon, and while I am super tempted I am not going to take down the ribbon on the tree and add the new stuff. I am extremely tempted though, and it still might happen.

Now quit reading and go to Hobby Lobby before everything is sold out.