Ahhh.. October, how I love thee. The weather finally cools off, the humidity leaves, the trees start to turn beautiful shades of orange, yellow and red. And the best part? Halloween! Pumpkins start popping up in the stores and my urge to carve up the orange squash is overpowering. I've been carving pumpkins for as long as I can remember and the year I turned 21 everything about carving changed for me. I didn't have to carve the triangle eyes, nose and blocky teeth! There were other ways of carving! I've never looked back and although it's no secret how to do this anymore, I'm going to show you the way
I do it.
You will need a few things first. Let's start with the pumpkin. If you didn't know you did need a pumpkin, stop reading now. This tutorial won't help you. While just about any pumpkin will work, you want to look for one that will help you instead of hinder. I try to get one with at least one nice flatter looking side. Most of my pumpkins are on the larger side because they tend to have a flat surface instead of being smaller and round...all around. I'm going to use this nice big one because I am going to carve two patterns into one pumpkin. I know,
two patterns on one pumpkin? Mind. Blown.
I'm going to skip the cleaning out part too. Basically cut open the top or bottom, whichever you prefer and scoop out the gooey inside parts. I happen to love this part. I like that slimy gooey mess. Once you have him cleaned out you want to scrape the inside wall where you are going to be carving. Try to make it at least an inch thick. Thinner walls means easier carving, but don't get them too thin. "Damn it, which is it? Thick, thin..make up your mind woman!". This takes a bit of practice, but you will get the hang of it. Just use your gut scooping scoop and scoop away at the inner walls.
You need a few more things before we begin with the how to. You will need a pattern. Patterns can be found all over this time of year. You can buy pattern books in the stores or find them to print out online, or draw your own. I'm going to use two patterns from Zombie Pumpkins (www.zombiepumpkins.com), my favorite place to get them. The patterns there are traditional cut through designs that are really stunning when carved, yet easy to do. They also have a superb collection of patterns with something for everyone, from small children to those who like the classic horror monsters to more traditional Halloween scenes.
You will also need some transfer paper. I always use Saral paper in the color blue. It's really nice to work with and won't smudge all over like some other transfer paper I have tried in the past. Plus the blue color shows up nicely on the orange of your 'kin.
Lastly you need a carving tool. I again use Zombie Pumpkins for this and use the carving knife sold on the site. You can buy plastic handle carving knives at most places like Walmart, but if you want something to last from year to year I would get the Pro Carving Tool from ZP. I've had mine a few years now and have not had to change the blade, which it comes with several in various sizes.
It's well used and dirty, but you get the idea.
O.K. lets begin!
Make sure the pattern you choose fits well on your pumpkin. You can always resize the pattern to fit if printing out from an online site. Cut the excess paper from around the pattern. I also position it a few times on the pumpkin before attaching to make sure it fits well.
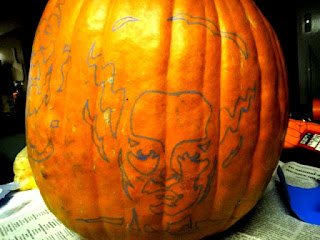
Frankensteins Monster and his lovely Bride.
Cut out some of your transfer paper a bit larger than the patterns and tape your pattern to the transfer paper. Now tape your patterns to the pumpkin, transfer side towards the 'kin. If your pattern refuses to lie flat in places you may need to fold the pattern a little or cut certain areas.
Next take a pen or pencil and trace over the lines on the pattern. You don't need to press very hard, at least with Saral paper. You don't want to pierce through the pattern with your pen or carve lines into the pumpkin, so save your superhero strength for later.
Once you have traced everything, gently pull off your patterns. You will be left with the pattern transferred nicely onto your pumpkin! Keep your pattern nearby so you can refer to it while carving. If you have any lines that did not transfer or transferred only half way draw them in with your pen.
Umm, yeah, I can totally tell what the heck that is... NOT!
START CARVING! Woot! The fun part, the part you have been waiting for! The part that brought you here! We finally came to that part! But wait! Don't take your little saw and start hacking away like a madman, or mad doctor trying to reanimate the dead. Take it slow and easy and begin in the middle of your pattern, working your way out. The first thing I do is slide the saw in along one of the lines and test the thickness of my pumpkin. If the saw doesn't poke out the other side, or only a tiny bit of the tip comes through I start scraping the inside again to thin it more. It's not my favorite part and by now I usually get it thin enough the first time. Don't try thinning once you are halfway through your carve, you will probably end up breaking something out that shouldn't be cut out. Once you are satisfied with the thickness cut along the blue lines with a sawing motion. Take your time. It's best if you remove pieces only after you have cut each piece of the pattern, it helps with stability. Try NOT to poke your pieces through to the inside of the pumpkin to remove them, instead gently push from the inside out.
I know, I said cut all pieces then remove. I'm just showing you how you start in the middle. Sheesh.
Once all pieces are removed you may have to do a little "clean up". Sometimes the pumpkin can be really stringy and leave some ragged looking edges or things that hang down into your cut out places. Carefully cut these pieces away with your saw.
Cut just along the inside and get rid of those stringy looking bits.
After that is done I give my pumpkin a quick sink shower. There is always little bits of pumpkin along the edges of the cut out pieces and a few guts still sticking to the outside. A quick spray down in the sink usually takes all those parts right off. Make sure and dry out the inside with a paper towel so your 'kin won't mold as fast. Some people use a spray of water and bleach to keep the mold away, others will smear Vaseline along the cut edges to help keep the pumpkin fresh longer. You can wrap it in Saran Wrap and store in the refrigerator when not on display or just simply set it outside and hope it lasts till the little Trick or Treaters rob you of all your good candy.
Whatever you do, always take a picture so you can remember that awesome pumpkin you carved and show everyone how talented you really are. Don't forget to roast those pumpkin seeds!


